This blog contains affiliate links, which means I may receive a (very) small commission if you click a link and purchase something. While I wish these commissions were enough to send me on monthly shopping trips to Paris, they do allow me to continue to produce content.
Showing posts with label Tutorials. Show all posts

Tuesday, September 4, 2012

Tutorial: Art Portfolio Case

I have a pattern drafting class at the local community college and they would like us to carry a foam board and poster board to class with us.  Those things are fairly awkward to lug across campus, so I needed something to carry them in.  I don't need much of an excuse to go buy fabric and I thought it would be a fun project to try and make an art portfolio case.

Here is the concept - essentially make two pillow cases, insert cardboard into them and then sew them together.  Put two zippers and handles on.


Items needed:
  • 3 yards fabric for portfolio case and lining
  • 1 yard contrasting fabric 
  • Two zippers 30 inches long (I custom cut mine from much longer zippers)
  • Cardboard 
  • Spray adhesive
The items I wanted to carry were 24 X 30 inches, so this case is specifically for that, but you could easily vary yours.  I could have chosen a different fabric for the inside, but I wanted the inside to look as nice as the outside, since it is made to open flat.

  • Cut 4 of main fabric.  26 x 32 inches square.
  • Cut 4 contrast on bias (case sides) 2.5 x 30 inches
  • Cut 2 of contrast (case bottom) 3.5 x 32 inches
  • Cut 2 of contrast (case handles) 6 x 18 inches
  • Cut 2 cardboard pieces 25 x 31 inches


  •  Prepare handle by folding the edges toward the center, then ironing.  Fold in half, then iron again.
  • Sew together.  I put another stitching line on the other side to match the seam line. 


  •  Sew handles to main fabric.  I marked the fabric with pins at 14 inches from each side and six inches down from the top.  Do this for two of the main fabric pieces.  These will be the outsides of the portfolio case.


  • On the last bottom 1.5 inches, I sewed a square with an x through it to secure it.  
  • Stop sewing the sides of the handles .5 inches from the top.  That part will be tucked under in a seam allowance. 


  •  With right sides together, sew two main fabric pieces together on three sides, leaving top open.  One on the pieces has a handle, one without.  Use .5 inch seam allowances.  
  • Repeat for the other two pieces and turn both of them right side out and iron seams flat.


  • You will now have two pillow case-like pieces with one handle on each pillow-case.


  • Sew right sides of case bottom contrast together, then turn right side out and iron flat with seams at sides.
  • Sew bottom contrast piece to inside of bags, stopping three inches before each corner.
  • The piece should be sewn to the inside of the case, sewing it to the side opposite the handles. Match edges.

  • When each side of the case bottom is sewn to the insides of the case, it will look like this.  Both edges are sewn to the insides of the case.


  • With right sides together, sew one piece of contrast side pieces together lengthwise with a 1/4 inch seam allowance. Repeat for remaining three pieces. This will make 4 long tubes.
  • Turn right side out and iron flat.
  • Sew strips of side contrast to zipper, sewing one piece of contrast to each side of zipper.  the zipper


  • The width of the two side pieces (with zipper attached) should be the same as the bottom of the case.

  • Sew sides with zipper attached to case bottom piece, two inches from edge.  This will allow the case to open flat.


  • Hand-sew the zipper assembly to the case with a pick stitch.  Here is a tutorial for a pick stitch.  I originally did this step by machine, but found that the tension was too hard to control and the zipper went in wavy, so I had better results with hand-sewing.
  • Leave top of zipper unfinished for now.
  • Fold top of case over 1/2 inch and press into place 


  • Insert cardboard into case sides through the top.  


  • Spray a thin layer of spray adhesive on the cardboard, then smoothed out the fabric over it, after positioning the cardboard in place.  This is done so that the fabric doesn't sag or bunch.


  • Hand sew top of case with a slip stitch.  Here is a tutorial on a slip stitch.  I imagine you could try to machine-sew it, but with the cardboard in it, I found this method easier.


  • Finish bottom of case contrast.  I folded the bottom over and hand-stitched it into place, hiding some of the zipper bottom.
 
  • Finish top of zipper.  I folded the zipper over and hand-stitched, making the top just lower than the top of the finished case. 
  • I am not thrilled about the seeing the back side of the pick stitches here... but I had to make a color choice with thread since I couldn't find a green zipper. Next time, I may choose to hide the zipper completely in the side contrast fabric instead of making tubes out of them.  For this time, I may color the green thread with a permanent black marker just to make the green thread a little less obvious.


  • This is the inside of the case.  I opens flat, but I found that really, really hard to photograph, so here it is open at a 90 degree angle.


    Monday, August 20, 2012

    Tutorial: Fixing a Zipper

    So, you make a really tailored (read: tight-fitting) dress for your Craftsy class Couture Dress.  And you hand-sew EVERYTHING in this puppy, including the lovely lapped zipper. Then, instead of trying to pull it over your head like someone sensible, you try and step into it.  However, you have hips that say to the world: "I really, really like eating chocolate."

    What happens?  You force the zipper teeth out of one side of the zipper and ruin it trying to squeeze your hips into it as if the dress were a glass slipper and you are a wicked stepsister.

    I didn't want to take the zipper out and replace it, given all of the hand-sewing.   This what to do to fix it.

    • First, take off the metal clamp at the bottom of the zipper.  I used a tool that was entirely inappropriate to do this (it was a seam ripper), but I am sure you have the good sense to use something else.
    •  Without the clamp at the bottom, you can lower the zipper pull (feeder?  head?) to below the teeth. Feed the zipper into the side where it is missing.   Make sure that the other side of the zipper is also near the bottom or it won't close properly, you'll have gaping zipper bits at the top and people will make fun of you.
    • Sew a circle of thread around the end of the zipper, slightly higher than where the clamp was. Sure, it would have been better to use white thread.  I see that now.
    • Enjoy victory chocolate.

    Saturday, August 18, 2012

    Tutorial: French Seams

    A new pattern I am working on calls for the bodice and skirt to be sewn using French seams.  I had heard of it and it certainly sounds snobby enough to be appealing, so I am all in.  The pattern directions had a brief description of what French seams are, but I didn't find it particularly useful, so I have written these instructions.  It turns out that these are really, really easy.
    • Start separate pieces of fabric that must be sewn together. (of course)
    •  Put the wrong sides of the fabric together.  It is backwards of how we normally sew.
    •  Sew the fabric, wrong sides together, with a small seam allowance.
    •  After sewing, cut the fabric close to the seam.
    •  Fold over the fabric so that right sides are together and sew as narrow of a seam allowance as possible, while hiding first seam in the fold.
    •  VoilĂ .  The inside of your garment looks nice and will not fray
    •  Close-up view of wrong side of French seam.


    Thursday, August 9, 2012

    Tutorial: Petticoat

    I was looking for a petticoat to wear under retro dresses and wasn't finding anything ready-made online that I liked.  Or if I liked it, I didn't care for the price tag*.  So, I decided to sew one, but I couldn't find any patterns.  Here is why: this is dead simple to make for not very much money. It took me about a full day to complete.

    There are tutorials online, and I found a couple excellent ones posted by lovely people who I am sure are better sewists than me.  They had super-flexible instructions for variable-tier petticoats any length you want with all kinds of calculations in them to figure out how much fabric you need and what width the tiers should be... phwah (eye roll). The truth was, I was looking for someone to do the math for me.  I also didn't love how they did the elastic at the waist.  They doubled over the tulle so that it was still scrunched up next to the skin.  I wanted to make a double layer of elastic that covered up the gathered tulle so that it would feel nice against my skin.

    So, here is a short, simple tutorial on how to make a three-tier petticoat that fits me.  It reaches my just above my knee and fits my waist.  Fine, fine, fine...  since I am sure some of you will insist on making a petticoat for someone other than me, I'll include the adjustment so you can fit it to your own waist.  The rest of the measurements will work for just about any size adult given she (or he - I don't judge) has waist circumference under 5 yards.

    If you follow this tutorial and make a petticoat, post a link to it.  I'd love to see it.

    Materials Needed
    • Elastic - 3/4 inch wide (2X waist circumference + 2 inches).  I put two layers of elastic in. You will need your waist circumference + 1 inches (example and helpful hint for a birthday gift for me: my waist is 28 inches, so I cut 30 inches of elastic)
    • Tulle - 5 yards - 54 inches wide
    • Cotton thread, elastic thread
    The petticoat is about 20 inches from waist to hem.  That is just above my knee.

    There are three tiers of tulle. The bottom tier is 15 yards long, second is 10 yards, and the last is 5.   All of them are 8 inches wide.


    1. Sew strips together.
      Prepare tulle: cut tulle into 8 inch strips.  My tullewas 54 inches wide, so I ended up with many 8" x 54" strips.  The petticoat is sewn by dealing with the bottom tier first, then working your way up to the waist, tier by tier. 
    2. Prepare bottom tier (15 yards long, 8" wide): sew strips together to form even longer strips, then once you have 15 yards of strips sewn together, sew the ends together, so you have a long circle. I used a serger for this.  You can use a regular sewing machine, but I would just be careful to trim the seam allowances since you will be able to see them from the outside of the petticoat (tulle being  see-through, and all).  You might be able to make a French Seam, but I haven't actually tried that for this.
    3. Prepare middle tier (10 yards): same as bottom tier, but only 10 yards
    4. Prepare top tier (5 yards):  same as bottom tier, but only 5 yards.
    5. Edging: one edge of the bottom tier, finish with a serger. I have seen people use some ribbon to finish the edge as if the ribbon were quilt binding or bias tape. 
      Finishing bottom edge on serger
    6. On the other edge of the bottom tier, use a basting stitch on a regular sewing machine and sew a continuous line.  This will serve as the thread to use for the gather.
      Serger finish on one edge, basting stitch on the other. 

    7. Mark four equidistant points on the bottom tier with safety pins.  This will mark four evenly sized sections of the bottom tier.  I wouldn't use straight pins because they would fall out of the thin tulle.
    8.  Mark four points with safety pins on the middle tier in the same way as the bottom tier.
      Pull one thread of basting stitch to gather.
    9. Gathering and serging, matching safety pinned points.
    10. Gather the bottom tier, pulling one thread of the basting stitch. Match safety pinned points and sew right sides of bottom and middle tier together (I did mine with a serger).  Bottom and middle tier will be sewn together and form one circle at this point.
      Bottom tier and middle tier sewn together.
    11. On the free edge of the middle tier, sew a straight line on sewing machine.  
    12. Mark four even sections with safety pins on top tier.
    13. Sew top tier to middle tier in the same way that middle was sewn to the bottom tier, gathering to make marks match.
    14. Sew one piece of elastic together so that it is a circle.  Trim seam allowance.
    15. Mark four equidistant points on the elastic and gather tulle, matching points.  Gather tulle to fit elastic.  Sew using regular thread and a zig zag stitch.
      Pinned top tier to elastic and gathering to match points.
      Sew top tier to elastic with zig-zag stitch.
    16. Change to elastic thread and attach elastic waist band to other side.  This covers up the rough-feeling tulle and makes things tidy.  I did two rows of stitching on this side so that elastic is secured.  Tulle is now covered and won't be scratchy.
      Sew second layer of elastic to cover tulle.
    17. Wear under retro dress!  Here is the yellow retro dress before and after the petticoat.I like it because this isn't SO puffy that I can't wear it in public.  It just adds a little extra fullness, but not out of control.  Here it is under the Bombshell Dress, as well.
    My Cost:
    • Elastic - Less than $2.00
    • Tulle - $1.00 per yard, $5.00 total
    • Elastic thread - $1.75
    • TOTAL - $8.75
    * I found the kind of petticoats I wanted for about $60.00 to $100.00.  I definitely don't want to insult my Etsy friends selling these ready-made or insinuate they are ripping anyone off.  It is more than a fair price considering this took me all day to make. I am saying that my time is far more abundant than my money and this was a fun little project.

    Sunday, April 1, 2012

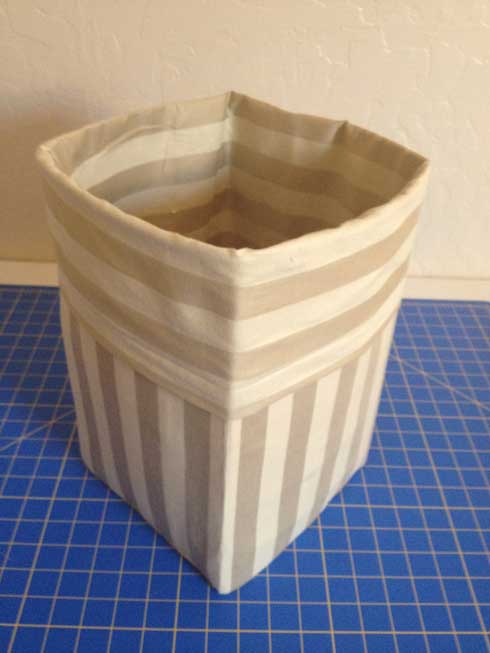
    Garbage Can

    I made a new garbage can for the sewing room.  I had some leftover heavyweight Pellon from the iPad cover project - I way over-purchased- and some fabric from the remnant pile.
    Here is the finished trash can.
     

    Cut from fabric:
    8 rectangles 19 inches x 9 inches each
    2 squares 9 X 9 inches
    Cut from heavyweight Pellon
    4 rectangles 8 X 13
    Use 1/2 inch seam allowance for sewing fabric

    1. Iron the Pellon on the wrong sides of 4 of the fabric rectangles, so that it is about 1/2 inch from three of the sides. 
    2. Sew the long sides of 4 of the rectangles together so that you have 3 seams and 4 panels (with the Pellon ironed in).  Sew as close to the Pellon as possible.
    3. With right sides together, sew forth edge together.  The Pellon will be on the outside and the right side of the fabric will be on the inside.
    4. Sew on the square to the bottom of the rectangle.  This is the inside of the can.
    5. Repeat making the rectangle with the other set of fabric pieces.  Turn right side out.  This is the outside of the can.  Insert inside of can (completed in previous step) into outside of can, so that only the right sides of fabric are showing.
    5. Fold over one inch of fabric twice and hem.  It now looks like a paper sack.  You can fold over the entire top of the trash can - there should be approximately 5 inches that fold over. (see picture)
    Related Posts Plugin for WordPress, Blogger...